I just wanted to write a quick blog post about what's coming up in the very near future.
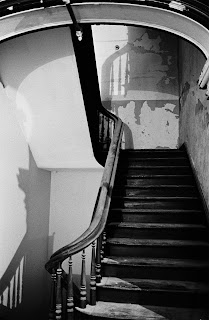
It's been awhile since my last blog post and some of you may have noticed that my Project 365 blog hasn't been updated in at least a week. I'm currently on vacation in San Francisco and Sonoma, California. I've been shooting daily with the following: Canon AE-1P, Hasselblad 500 c/m, Holga 120N, (2) Polaroid SX-70s and a Polaroid 440 Automatic Land Camera. I will have another entry into my Prison/Mental Institute series and a number of Impossible Project images to upload, including the images that are part of my almost complete Project 365. Once I get back, I'll update that page as well as post about my Cali trip as soon as I have the film processed.
In addition to that, here's what I have coming up:
- 2011: Year in Review- I'll be looking back on the photo resolutions I set forth at the beginning of 2011 and reflect on which ones I accomplished, how I've grown as a photographer and provide any other insights I have at this time.
- 2012 Photo Resolutions- Similar to last year, I already have a set of goals in relation to my photography that I would like to achieve in the upcoming year. I'll talk about what those are and how I plan on accomplishing those.
- Kodak "oldies"- I have picked up the following over the course of the year: Kodak Tourist II, Kodak Brownie Hawkeye Flash and a Kodak Brownie Model 2A. The Kodak Tourist takes 620 film and is currently loaded with a respooled roll of Kodak Tri-X 400; The Kodak Brownie Hawkeye Flash also takes 620, but is currently being fitted for a tripod mount; and the Kodak Brownie Model 2A takes defunct 116 film; however, I've had it modified to accept 120 film and replaced the viewfinder mirrors. So, I'll be taking this trio of cameras out and shooting some test rolls, developing them and going over the modifications and results. I may even do a video review along the lines of my Diana F+ review.
So, those are just a few things that I already have on tap for this blog. I do have one more surprise coming, so, log in on January 9 to see what that surprise is. In the meantime, I hope you've all had a wonderful holiday season and I hope you've enjoyed reading and following me along this photographic journey that I've embarked on. Have a great new year and stay tuned for all the things I just listed and more!

Monday, December 26, 2011
Monday, November 28, 2011
Random Film - Adox CHS 50 ART
The next film I'm going to discuss in my "Random Camera/Random Film" series is an emulsion from Germany. Adox was founded in 1860 and touts itself as the world's first photochemical factory. They produced two films that were dubbed the "German Wonderfilms;" they were the KB14 and KB17. In fact, those films are still produced today and are known as Adox CHS 25 and Adox CHS 50. It just so happens that I've shot a lot of the Adox CHS 50 film and that's what I'll be discussing today.
Adox CHS 50 is a thin layer black and white film that produces the second finest grain from the Adox film line. According to Adox's website, the film has a wider latitude than the CHS 25. You can expose the shadows and also develop the highlights. I wish I could provide an expert opinion on pushing, pulling, exposure and development of this film, but I have yet to dive into the world of home development. My lab, Blue Moon Camera and Machine, have handled the processing of this film.
I can tell you that I've shot six rolls of the Adox CHS 50 and I've been very pleased with the results, even in a few extremely low light environments. My first impression of this film is that it has a wide tonal range and provides significantly less contrast than the black and white film I'm most familiar with - Kodak Tri-X 400. It has a vintage look that's very pleasing on the eye, especially when used for portraits. Adox CHS 50 was the first professional film that I used in my Hasselblad 500 c/m when I wandered around downtown Findlay, Ohio during the FPP Midwest Meet-Up earlier in the summer. The films' grain structure was perfect for some of the urban decay/landscape images that I was after. It was very forgiving for any exposure misreading I may have obtained since it was my first experience metering for myself. Below are a few results from that first roll; notice the grain structure and the tonal range in the images.

F/4 @ 1/125 second

Camera: Hasselblad 500 c/m
Lens: 150mm f4
F4 @ 1/500 second
My second experiment with this film was for a project that I've not discussed at length. I've simply previewed it on this blog, but it was a project that was a number of steps outside of my comfort zone. Portraiture was the main focus of the project and the film performed extremely well. Again, it provided a nice tonal range and it was well suited for the portraiture work. The main flaw for me wasn't the film, but mastering the focus on my Hasselblad and it's 150mm lens. In the sharpest images, the details were presented perfectly. At the completion of this project, I had shot a total of 4 1/2 rolls of the Adox CHS 50. Following the portraiture project, I had an impromptu visit to East Texas and decided to bring a roll of Adox and my Hasselblad to shoot. I'll get to that shooting experience after the following images shot on the Adox CHS 50 ART for my portraiture project.

Camera: Hasselblad 500 c/m
Lens: 150mm f4
F8 @ 1/60 second

Camera: Hasselblad 500 c/m
Lens: 150mm f4
F8 @ 1/30 second

Camera: Hasselblad 500 c/m
Lens: 150mm f4
F5.6 @ 1/60 second

Camera: Hasselblad 500 c/m
Lens: 150mm f4
F4 @ 1/15 second
As I mentioned, I took a trip to East Texas and decided to bring the Hasselblad and a roll of Adox to take a few images of Gilmer and Fort Worth while I was there. I shot about half of the roll in Gilmer, during a hot, sunny day. The second half of the roll I shot at night in the historic stockyards of Fort Worth. I wasn't worried about the Gilmer shots, but I was a little leery about how the film would perform at night with very little light. It's a slow film, with an ISO of 50; so, I knew I would be mounting the Hasselblad on my tripod for long exposures. The night shots weren't perfect, but they came out better than I expected. When I have more time, I would like to test this film in additional night settings. Below are a few results from the Texas trip.

Camera: Hasselblad 500 c/m
Lens: 150mm f4
F16 @ 1/30 second

Camera: Hasselblad 500 c/m
Lens: 150mm f4
F11 @ 1/60 second

Camera: Hasselblad 500 c/m
Lens: 150mm f4
F16 @ 1/60

Camera: Hasselblad 500 c/m
Lens: 150mm f4
F16 @ 1/60 second

Camera: Hasselblad 500 c/m
Lens: 150mm f4
F4 @ 1 second

Camera: Hasselblad 500 c/m
Lens: 150mm f4
F4 @ 2 seconds
The last roll of Adox that I shot was a roll of 35mm. I shot this roll throughout the summer. I started it at the FPP Midwest Meet Up, I continued it through my unnamed portraiture project, and I finished shooting it at various locations throughout Ohio. The 35mm performed quite well, however, I did notice that it provided much more contrast than my rolls of 120. Below are a few images of the 35mm Adox CHS 50 ART.

Camera: Canon AE-1P
Lens: 50mm
F4 @ 1/60 second

F8 @ 1/250 second

Camera: Canon AE-1P
Lens: 50mm
F4 @ 1/500 second

Camera: Canon AE-1P
Lens: 50mm
F2 @ 1/500 second

Camera: Canon AE-1P
Lens: 50mm
Shot on Program Mode

Camera: Canon AE-1P
Lens: 50mm
F2 @ 1/30 second

Camera: Canon AE-1P
Lens: 50mm
Shot on Program Mode
So, after six rolls of Adox CHS 50 ART, both 120 and 35mm, I would say that I can establish a pretty fair opinion of the film. The film has a very smooth tonal range, composed of whites, blacks and a very large range of grays. It has a vintage look and feel to it and it's well suited for both urban decay, urban landscapes and portraiture. It wouldn't be the first film that I would grab for an outing of low light and night time shooting, but with a tripod and long exposures you can still achieve satisfying results. It's low speed will also work well in vintage cameras with fixed shutter speeds, such as Kodak Brownie box cameras. I will definitely be shooting more of this film in the future and I highly recommend testing it out. For home developers and technical spec junkies, here's a link to the film's data sheet. To learn more about Adox, check out their site here.
Adox CHS 50 is a thin layer black and white film that produces the second finest grain from the Adox film line. According to Adox's website, the film has a wider latitude than the CHS 25. You can expose the shadows and also develop the highlights. I wish I could provide an expert opinion on pushing, pulling, exposure and development of this film, but I have yet to dive into the world of home development. My lab, Blue Moon Camera and Machine, have handled the processing of this film.
I can tell you that I've shot six rolls of the Adox CHS 50 and I've been very pleased with the results, even in a few extremely low light environments. My first impression of this film is that it has a wide tonal range and provides significantly less contrast than the black and white film I'm most familiar with - Kodak Tri-X 400. It has a vintage look that's very pleasing on the eye, especially when used for portraits. Adox CHS 50 was the first professional film that I used in my Hasselblad 500 c/m when I wandered around downtown Findlay, Ohio during the FPP Midwest Meet-Up earlier in the summer. The films' grain structure was perfect for some of the urban decay/landscape images that I was after. It was very forgiving for any exposure misreading I may have obtained since it was my first experience metering for myself. Below are a few results from that first roll; notice the grain structure and the tonal range in the images.

Camera: Hasselblad 500 c/m
Lens: 150mm f/4F/4 @ 1/125 second

Camera: Hasselblad 500 c/m
Lens: 150mm f4
F4 @ 1/500 second
My second experiment with this film was for a project that I've not discussed at length. I've simply previewed it on this blog, but it was a project that was a number of steps outside of my comfort zone. Portraiture was the main focus of the project and the film performed extremely well. Again, it provided a nice tonal range and it was well suited for the portraiture work. The main flaw for me wasn't the film, but mastering the focus on my Hasselblad and it's 150mm lens. In the sharpest images, the details were presented perfectly. At the completion of this project, I had shot a total of 4 1/2 rolls of the Adox CHS 50. Following the portraiture project, I had an impromptu visit to East Texas and decided to bring a roll of Adox and my Hasselblad to shoot. I'll get to that shooting experience after the following images shot on the Adox CHS 50 ART for my portraiture project.

Camera: Hasselblad 500 c/m
Lens: 150mm f4
F8 @ 1/60 second

Camera: Hasselblad 500 c/m
Lens: 150mm f4
F8 @ 1/30 second

Camera: Hasselblad 500 c/m
Lens: 150mm f4
F5.6 @ 1/60 second
Camera: Hasselblad 500 c/m
Lens: 150mm f4
F4 @ 1/15 second
As I mentioned, I took a trip to East Texas and decided to bring the Hasselblad and a roll of Adox to take a few images of Gilmer and Fort Worth while I was there. I shot about half of the roll in Gilmer, during a hot, sunny day. The second half of the roll I shot at night in the historic stockyards of Fort Worth. I wasn't worried about the Gilmer shots, but I was a little leery about how the film would perform at night with very little light. It's a slow film, with an ISO of 50; so, I knew I would be mounting the Hasselblad on my tripod for long exposures. The night shots weren't perfect, but they came out better than I expected. When I have more time, I would like to test this film in additional night settings. Below are a few results from the Texas trip.

Camera: Hasselblad 500 c/m
Lens: 150mm f4
F16 @ 1/30 second

Camera: Hasselblad 500 c/m
Lens: 150mm f4
F11 @ 1/60 second

Camera: Hasselblad 500 c/m
Lens: 150mm f4
F16 @ 1/60

Camera: Hasselblad 500 c/m
Lens: 150mm f4
F16 @ 1/60 second

Camera: Hasselblad 500 c/m
Lens: 150mm f4
F4 @ 1 second

Camera: Hasselblad 500 c/m
Lens: 150mm f4
F4 @ 2 seconds
The last roll of Adox that I shot was a roll of 35mm. I shot this roll throughout the summer. I started it at the FPP Midwest Meet Up, I continued it through my unnamed portraiture project, and I finished shooting it at various locations throughout Ohio. The 35mm performed quite well, however, I did notice that it provided much more contrast than my rolls of 120. Below are a few images of the 35mm Adox CHS 50 ART.

Camera: Canon AE-1P
Lens: 50mm
F4 @ 1/60 second

Camera: Canon AE-1P
Lens: 50mmF8 @ 1/250 second

Camera: Canon AE-1P
Lens: 50mm
F4 @ 1/500 second

Camera: Canon AE-1P
Lens: 50mm
F2 @ 1/500 second

Camera: Canon AE-1P
Lens: 50mm
Shot on Program Mode

Camera: Canon AE-1P
Lens: 50mm
F2 @ 1/30 second

Camera: Canon AE-1P
Lens: 50mm
Shot on Program Mode
So, after six rolls of Adox CHS 50 ART, both 120 and 35mm, I would say that I can establish a pretty fair opinion of the film. The film has a very smooth tonal range, composed of whites, blacks and a very large range of grays. It has a vintage look and feel to it and it's well suited for both urban decay, urban landscapes and portraiture. It wouldn't be the first film that I would grab for an outing of low light and night time shooting, but with a tripod and long exposures you can still achieve satisfying results. It's low speed will also work well in vintage cameras with fixed shutter speeds, such as Kodak Brownie box cameras. I will definitely be shooting more of this film in the future and I highly recommend testing it out. For home developers and technical spec junkies, here's a link to the film's data sheet. To learn more about Adox, check out their site here.
Tuesday, November 22, 2011
Random Camera - Lomography Diana F+
For this post, I'm going to try something a little bit different. I'm going to post a video unboxing (even though this isn't the newest camera on the block), overview and review of the camera and my results thus far.
It might surprise some of you, but the Diana camera has been around since the '60s. According to the Lomography website, there was a small Hong Kong firm named "The Great Wall Plastics Factory" that created the Diana camera, made entirely of plastic, for a cost of about a dollar a camera. The camera was a commercial failure and was discontinued in the '70s. It gained a popularity among avant garde artists and lo-fi photographers for the type of images it produced. There were many Diana "clones" produced during the same time, but the shift in consumer preference to 35mm doomed the camera. However, in 2007, Lomography decided to "rebuild" the camera from the ground up and the Diana F+ was born. The original Diana was equipped with two shutter speeds, three apertures and manual focusing. The Lomography rebirth of the Diana kept the main features of the original, but added a few new tricks to the old dog of a camera. It was now equipped with a pinhole mode, endless panoramas and a boat load of accessories.
So, now that you know a little history about the Diana, let's get to the video unboxing and results gallery!
After recording and watching this blogpost, there are a few things that I would like to change as I produce more of these segments. So, I hope you'll forgive the long-windedness, the less than stellar camera placement and the other flaws with my first video review. Regardless, I hope you have a better idea of the Diana F+ and the results it can achieve. Here are the images that were featured in the video:
Roll #1 - Lomography Color Negative 100


Roll #2 - Ilford Delta Pro 3200 Black and White (The Loose Roll)


The most recent roll of film I shot through the Diana F+ was only my second roll; so like most of my other cameras, I'm still learning their intricacies and peculiarities. The first roll of film that I ran through my Diana F+ was Lomography Color Negative 100 and I shot that on my weekend photo trip to Mansfield, Ohio earlier this year. The second roll was Ilford Delta Pro 3200 black and white. I had a few nice shots on the first roll, so I was expecting a better outing with my second roll. Unfortunately, that didn't occur. Before I get to the video review and my results, here's a little background info on the Diana F+.
It might surprise some of you, but the Diana camera has been around since the '60s. According to the Lomography website, there was a small Hong Kong firm named "The Great Wall Plastics Factory" that created the Diana camera, made entirely of plastic, for a cost of about a dollar a camera. The camera was a commercial failure and was discontinued in the '70s. It gained a popularity among avant garde artists and lo-fi photographers for the type of images it produced. There were many Diana "clones" produced during the same time, but the shift in consumer preference to 35mm doomed the camera. However, in 2007, Lomography decided to "rebuild" the camera from the ground up and the Diana F+ was born. The original Diana was equipped with two shutter speeds, three apertures and manual focusing. The Lomography rebirth of the Diana kept the main features of the original, but added a few new tricks to the old dog of a camera. It was now equipped with a pinhole mode, endless panoramas and a boat load of accessories.
So, now that you know a little history about the Diana, let's get to the video unboxing and results gallery!
After recording and watching this blogpost, there are a few things that I would like to change as I produce more of these segments. So, I hope you'll forgive the long-windedness, the less than stellar camera placement and the other flaws with my first video review. Regardless, I hope you have a better idea of the Diana F+ and the results it can achieve. Here are the images that were featured in the video:
Roll #1 - Lomography Color Negative 100


The last two shots in that series were shot using the Diana F+ pinhole mode. I really like the results I was able to achieve using this mode and I look forward to experimenting with it more in the future. The next set of images is from my second roll, which was shot on Ilford Delta Pro 3200. This is the loose roll that I mentioned in the video. The effect on the film was the interesting light leaks and the backing paper image being burned onto some of the exposures. I like the effect it had on some of the images and that's part of the fun/appeal of a Lomography camera.Roll #2 - Ilford Delta Pro 3200 Black and White (The Loose Roll)


So, not bad for the first two rolls on the Diana F+. I look forward to trying the camera out with the small modification I made to the spool/film holders. I hope it fixes the "loose roll" problem and I'll be anxious to display the results. If you're interested in checking out the results of a few professionals that use the Diana, check out Mark Sink and Allan Detrich.
Sunday, November 13, 2011
Random Camera - Lomography Fisheye No. 2
Last week I shared a few images and my thoughts on Lomography's Redscale film. This week, I'll do the same with the Lomography Fisheye No. 2 camera. I received this camera as a Christmas gift from my wife last year. I ran a test roll of Fuji Superia 400 color negative film through it and had it processed at the local Walgreens. The results were less than satisfying, but they did unveil a few pecularities of the Fisheye camera that would be helpful for all future rolls.
The Lomography Fisheye No. 2 camera was launched by Lomography in 2006; just one year after their successful launch of the original Fisheye camera. According to their site, the original Fisheye quickly became the best selling plastic camera of all-time; I'm not sure if those numbers still stand, but based on the Flickr groups and the images uploaded on Lomography, it's still very popular.
The Fisheye No. 2 camera is a very compact, lightweight, 35mm shooter. It's 10mm f/8 lens captures roughly 170 degrees of your surrounding environment. The camera has two shutter speeds; 1/100 of a second and bulb, which of course allows for long exposures. The Fisheye No. 2 also comes with a hot shoe mount and a built in flash as well as a handy multiple exposure switch. All of these features make for a compact, fun, lomographic experience of film photography.
After shooting a roll of film and viewing the results, you'll quickly discover that the Lomography Fisheye No. 2 is a camera that likes a lot of light. Even if you shoot 400 speed film like I did, a sunny, well-lit environment performs best for this camera; unless of course you're shooting at night and using the long exposure button. In my first roll, I wasn't aware of this fact and only about half of my exposures came out. I fared much better with my second roll; I didn't lose a single exposure. The other thing that takes some practice is the viewfinder. Similar to all toy/plastic cameras, their is not a mirror system in place. So, what you see through the viewfinder is not exactly what the lens sees. With the Fisheye No. 2, I've had a tendency to frame the top of the shot too close. With a little practice, it's easy to adjust and you won't be in for any surprises when you get your results back. The multiple exposure button is a nice feature that makes double exposures super easy. Once you fire a shot, simply click the MX switch and fire another exposure. Do it again for a triple exposed shot or simply wind the film to the next frame. I didn't try the MX switch with my first roll, but I did with my second and I liked the result.


The second roll of film I ran through the Fisheye No. 2 was again the Fuji Superia 400 color negative. This roll took about 10 months for me to finish. I loaded it in January and it stayed in the camera until October. I carried the Fisheye No. 2 with me everywhere, but I only shot it when I felt I had the appropriate subject or the appropriate scene for the extreme look the fisheye lens creates. Once I received the processed film back from Blue Moon Camera and Machine, it was like Christmas. Each image, possibly taken months ago, was like a present. I literally experience the changing of the seasons on one roll of film. The Fuji Superia 400 is a basic consumer film, found at local supermarkets and big box stores. The colors are not heavily saturated and the film produces a very noticeable grain. The Superia is not a film that I will purchase on a regular basis, but it was perfect for experimenting with a new camera.


All in all, the Fisheye No. 2 camera is a fun little camera. I wouldn't recommend it for everyday shooting, but it's a great camera suited for experimentation. The multiple exposure button, the 170 degrees of view and the extreme close-ups are perfect for creating unique images that help communicate artistic vision. If you're shooting the camera for fun versus artistic expression, it's perfect for parties and hanging out with friends because of the unexpected results. In fact, after seeing my second roll of film, I'm looking forward to using the Fisheye No. 2 a lot in 2012.


Sunday, November 6, 2011
Random Film - Lomography Redscale 100
First, I would like to apologize for not keeping up with the new features of the blog that I planned on implementing awhile back. I briefly discussed some photo news in one post, but I've yet to launch the photographer profile section. I was busy with a few other things in my life at the time and I haven't been able to keep it as updated as I would like. I still plan on launching that section and providing some additional photo news, I just don't have a timeline for it.
I recently blogged about my trip to the Trans-Allegheny Lunatic Asylum. In preparation for that trip, I had to finish shooting a number of started rolls in various cameras. I recently finished all of those rolls and just received them back from processing. My next few posts will be dedicated to talking about the film used, the cameras they were shot with and the images. The first film that I'm going to discuss is Lomography Redscale 100.
When I purchased my Hasselblad 500 c/m, the only roll of film I currently had lying around to test it out was the redscale film. Two items that are on opposite ends of the spectrum; one of the sharpest medium format cameras made and a film that is shot on the opposite side of the emulsion and sold by a company that embraces the flaws, light leaks, the imperfections and the accidents in analog photography.
According to Lomography, the redscale film is the world's first preloaded and ready to shoot redscale film. In fact, the redscale effect can actually be achieved by simply loading 35mm in a camera backwards. The back of the film has a semi-transparent layer to protect the emulsion from extra light hitting it and when the film is flipped, shooting through this layer produces red, orange and yellow tones. This effect is very similar to shooting through a red or orange filter with unpredictability thrown in.
The key word for this film is unpredictable, because that's exactly what shooting Lomography Redscale film is. It's rated at a speed of 100 and I took it out on a very sunny day. I was armed with the Hasselblad and a light meter. I took my time setting up shots and tried to get the correct exposure. When I received my processed film, I wasn't that happy with the final results. They lacked the range of reds, oranges and yellows that i saw in the Lomography gallery. Some of my shots were dark, bluish and green. In addition to that, the film was prone to heavy scratches. One roll wasn't enough to make a solid judgement, so I felt I needed to give the film another chance. Below are a few examples of the Hasselblad red scale images.

Shot at F5.6 @ 1/60 second

Shot at F5.6 @ 1/250 second

Shot at F5.6 @ 1/125 second
The next time around, I decided to shoot redscale through my Holga. I felt that I might get better results using a "lo-fi" camera with a "lo-fi" film. This particular roll of film took awhile for me to finish up; I shot it in a number of different locations, but I tried to use it in as much light as possible. The results were better this time around, but I still received dark and muddy results in a few of the frames. In addition to that, there was an odd bluish-green fogging that appeared on the film during processing. Now, I use a highly professional lab, so I don't chalk that up to the technicians that processed the film. I think the film is highly unpredictable, which can be expected by basically shooting through its' backside.
In my opinion, to achieve the best possible results from the film, one should shoot this film on a bright and sunny day and overexpose by about two stops to achieve the best possible tonal range the Lomography Redscale film has to offer. It's an interesting film; one that I probably won't use too often. When exposed properly, it produces a distinctive, enjoyable result. Results that can be quite stunning. But, if you're not into Lomography and unpredictable flaws, this film is not for you. Here are a few images from the second roll of redscale that I shot on my Holga:


Wednesday, October 12, 2011
Trans-Allegheny Lunatic Asylum
A few blog posts back, I mentioned that I was working on multiple projects; projects which had no set completion date; projects that might take a few years until I feel they're complete and ready for public viewing. I recently completed the second photo shoot for one of those projects. This project, in its' entirety, is far from completion; however, I want to talk about the recent shoot and share a few images. This will provide me with an outlet to discuss the project at various stages as well as provide you with a sneak peak into some of the images.
In June of this year, I visited the Mansfield Reformatory. It was a wonderful photographic journey which I shot entirely on Kodak Tri-X 400 black and white film. The reformatory and the experience I had photographing it inspired me to continue with that work. The research began and I started compiling a list of abandoned prisons and mental institutes that I would like to photograph. I'll be shooting these facilities on a variety of cameras, but I'll only be using Kodak Tri-X 400 film. The goal is to tell a story about each of these buildings through my final images as well as providing a look into the history of the correctional process of our nation. I'm not sure when this will be complete, but I can tell you that I do have another institute lined up before the end of the year.
On September 25, Brittany and I traveled to Weston, West Virginia. Weston is a very small town about 5.5 hours from Troy, Ohio. It's approximately 50 miles south of Morgantown. There's not much there, sans three hotels, a Walmart, a few fast food restaurants, a quaint downtown and a massive European structure known as the Trans-Allegheny Lunatic Asylum. According to their website, the Trans-Allegheny Lunatic Asylum was constructed between 1858 and 1881 and is the largest hand-cut stone masonry building in North America and is reportedly the second largest in the world, only behind the Kremlin. Richard Andrews designed the structure according to the Kirkbride plan (which influenced over 300 similar institutions over North America) and the original hospital was meant to hold 250 individuals. It opened to patients in 1864 and reached its' peak in the 1950s with 2,400 patients. In fact, it is rumored that Charles Manson actually spent some time at the facility, but there is no official record. Apparently the administrators used an alias for him because the community was outraged at the prospect of him being brought to the facility. Trans-Allegheny Lunatic Asylum was eventually closed in 1994; this was a mortal blow to the local economy and it's obvious that it's never quite recovered.
This structure is quite eerie, yet strikingly beautiful. I had scheduled 8 hours of shooting on Sunday; the first four to begin at 8 a.m. and end at 12 p.m. The final four from 2-6 p.m. We pulled up to the asylum around 7:20 a.m. and a heavy layer of fog surrounded the building. It was the perfect setting for exploring this abandoned treasure all day. My photography tour covered the main hospital, the grounds, the medical building, the geriatric building, the forensics facility and the women's center. All areas were in a complete state of decay, the outlying buildings more so than the hospital. Paint was peeling from the walls and ceilings, floors were reduced to dirt, ceiling tiles were hanging by a thread and debris was scattered everywhere. It's completely cliche, but if walls could talk in that facility, I'm sure they would have stories upon stories to tell. This structure was as I expected and it was the perfect follow-up to my Mansfield Reformatory shoot. I am very pleased with the images and I look forward to exploring more of these facilities as I continue with this project. For now, I've included a few of my final images.


Subscribe to:
Posts (Atom)